
Note: This is a guest blog post by Elisha Kramer, Tech Lead at Fiverr. He is also one of the top contributors of the leading gpt-researcher Github project by Assaf Elovic.
After experimenting with the new LangGraph Cloud feature, we were so excited that we had to write about it. Below, we’ll show of how we deployed our LangGraph Cloud Host & queried it from the GPT Researcher frontend (NextJS).
What is GPT Researcher?
GPT Researcher is an open-source autonomous agent designed for comprehensive online research on a variety of tasks. The open source has grown in popularity over the past year, with over 13K stars and a community of 4K+ developers.
GPT Researcher has also been evolved over time, starting as a successful RAG implementation and now using multi-agents with the popular LangGraph framework.
But there was still a missing piece. GPT Researcher didn't yet have a top-standard front-end application and was still built on simple HTML and CSS. We’re excited to introduce our latest client built with NextJS, designed to provide an optimal research experience! Check out a demo here.
How does LangGraph tie into the picture?
As we started trying to build context-aware AI agents capable of reasoning through problems, we discovered the LangChain library and LangGraph.
Specifically, we were hooked on the concept of LangGraph: a framework that could enable us to build out complex multi-agent flows where AI agents coordinate with other agents, bringing their unique perspectives and reviewing each other's work.
LangGraph turned out to be a great fit for that! And the ability to easily connect our new frontend to a cloud-based version of GPT Researcher sounded too good to be true.
What is LangGraph Cloud?
The concept behind the LangGraph Cloud Host is very similar to the concept behind a GraphQL API Server.
A GraphQL API Server:
- Can help abstract away access to a database
- Can leverage any library of the Server Language
So too, a LangGraph API Server can:
- Abstract away access to a LangGraph
- Leverage any pip package used within your LangGraph
Essentially, you’re deploying a Python server with your LangGraph baked into it. And while you’re at it, you get a bunch of stuff for free; here are the API endpoints automatically exposed on your LangGraph Cloud Host to enable easy job-triggering & graph edits.
What did we deploy?
In our case, the brunt of the work was done by Assaf, founder of GPT-Researcher, when he built a multi-agent workflow leveraging LangGraph. (Feel free to read up on that adventure in this earlier post: How to Build the Ultimate AI Automation with Multi-Agent Collaboration.)
Once that multi-agent flow was built with LangGraph, it set the stage for some easy wins down the road. Several weeks later, Harrison (CEO of LangChain) stepped in & created a pull request to enable us to easily deploy Assaf’s pre-built LangGraph: Here’s the GPT Researcher PR.
The beauty of that PR was that it made our GPT-Researcher LangGraph easily available to deploy, edit & trigger with custom parameters via an API Call. Wow! Only 4 changed files to go from our dev environment to a scalable production-ready service!
Querying the LangGraph API Server
It took me a while to fully appreciate the simplicity of the previous 2 steps. It couldn’t be that easy to trigger a multi-agent LLM workflow... could it?
Turns out, it was.
Building on top of Assaf & Harrison’s code, all we needed to do was the following.
Step 1: Watch Harrison’s deployment tutorial
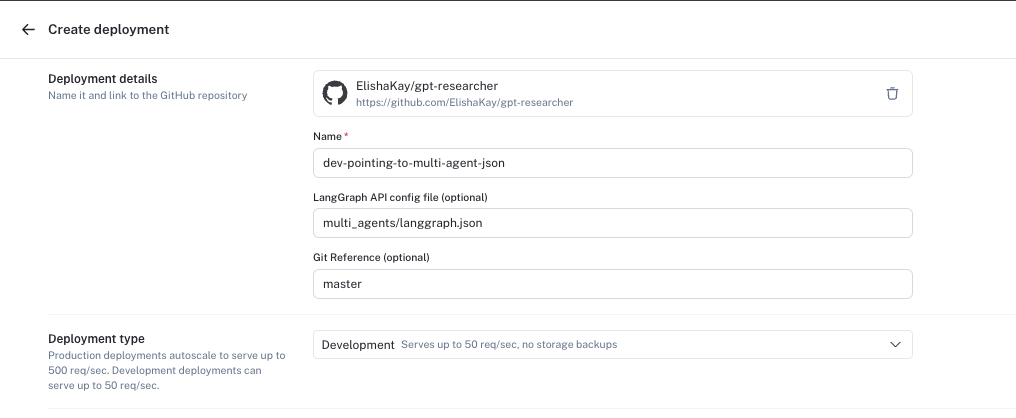
Step 2: Deploy our custom LangGraph via the LangSmith GUI’s “Deployments” tab.
In our case, I selected my fork of the GPT Researcher Project & pointing to my langgraph.json config file within GPT Researcher’s multi_agents directory (see below)
Step 3: Add my environment variables to my LangGraph Cloud deployment.
These should suffice:
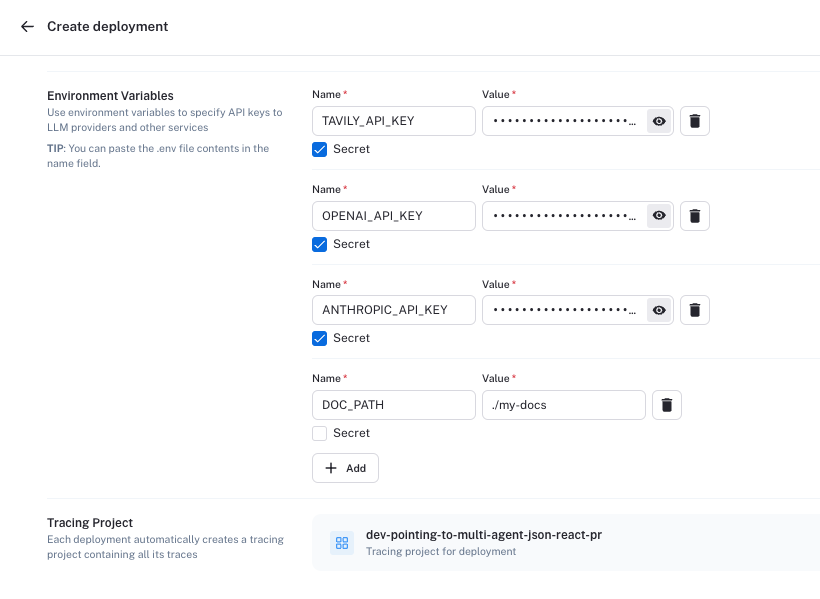
Notice in the screenshot above that LangGraph Cloud will automatically create a “Tracing Project” for me.
That means we get the same LangSmith tracing benefits that we got with our MVP multi-agents flow. Here’s what it looks like:
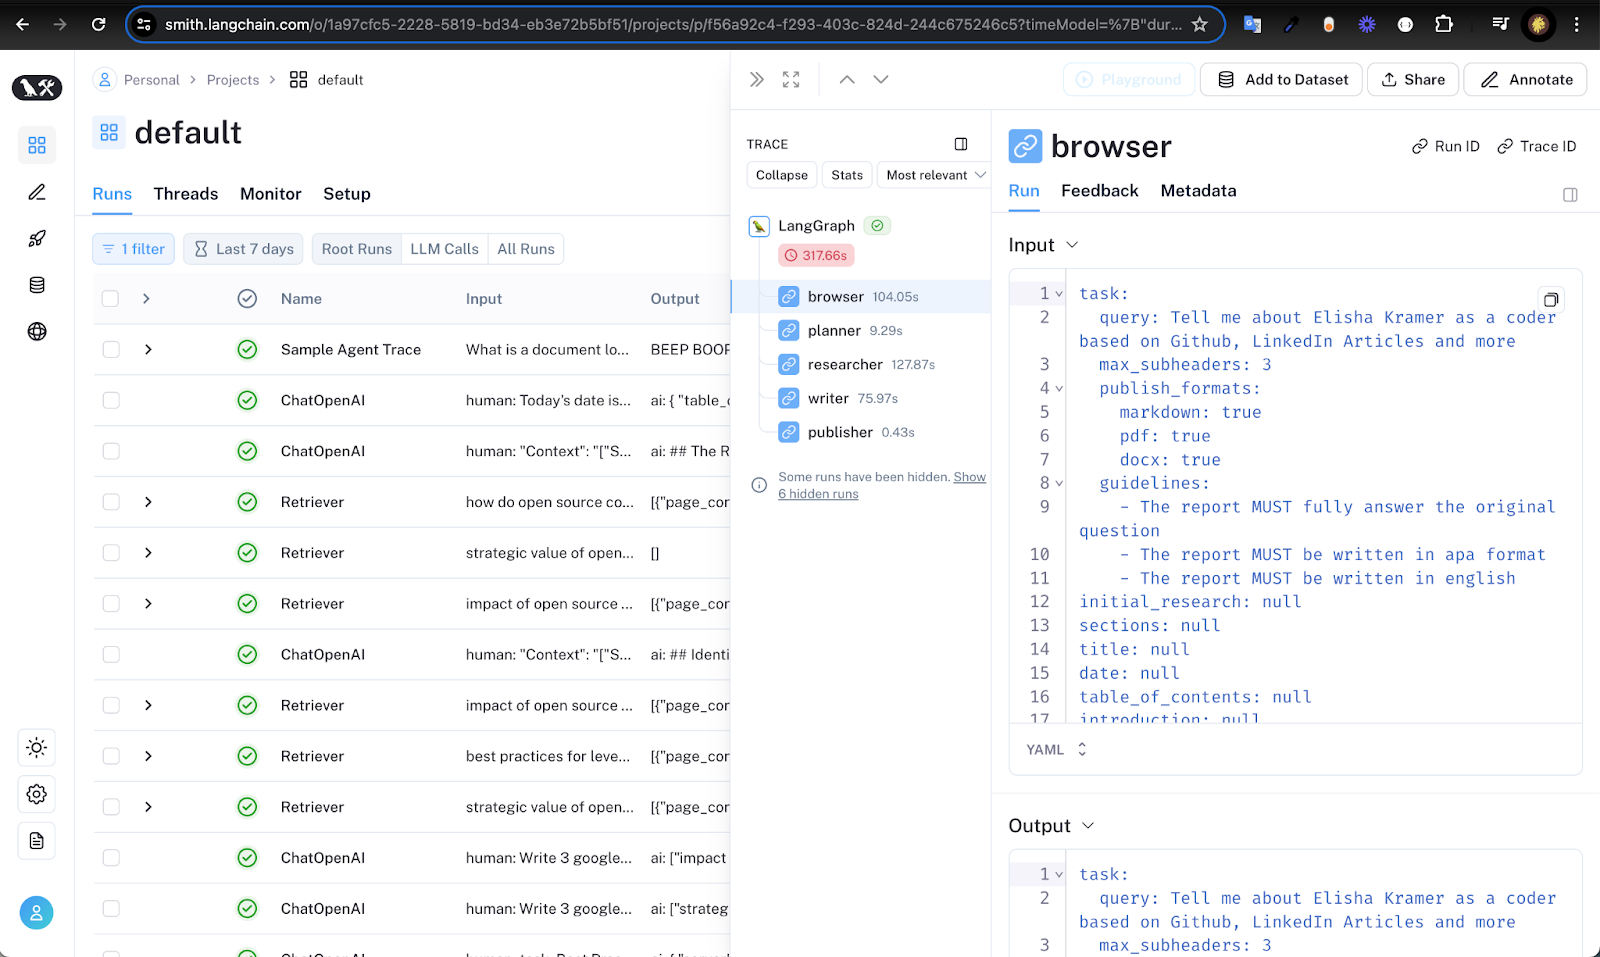
And here’s what you get — a powerful tool for:
- Enabling users to visualize and inspect the backend data flow
- Quality assurance debugging - i.e. where can the input or output of our AI flows use improvement
Step 4: Query the newly deployed LangGraph.
Here’s a sample of the React Code:
import { getHost } from '../../helpers/getHost';
import { Client } from "@langchain/langgraph-sdk";
import { task } from '../../config/task';


export async function startLanggraphResearch(newQuestion, report_source) {
   // Update the task query with the new question
   task.task.query = newQuestion;
   task.task.source = report_source;
   const host = getHost({purpose: 'langgraph-gui'});
   const client = new Client({apiUrl: host});
    // List all assistants
   const assistants = await client.assistants.search({
     metadata: null,
     offset: 0,
     limit: 10,
   });

   const agent = assistants[0];
    // Start a new thread
   const thread = await client.threads.create();
    // Start a streaming run
   const input = task;
    const streamResponse = client.runs.stream(
     thread["thread_id"],
     agent["assistant_id"],
     {
       input,
     },
   );


   return {streamResponse, host, thread_id: thread["thread_id"]};
}
The task object imported at the top of the file can be thought of as our API Request object. It’s practically identical to the task.json file leveraged by Assaf’s LangGraph.
The getHost function either returns localhost:8123 (for the langgraph-cli service) or the domain of the LangGraph Cloud Server we deployed on.
And that’s pretty much all there is to it. The above code enables us to trigger a run on the LangGraph server - which is fully observable on the LangSmith User Interface! Here’s the continuation of the above code which displays to the user the status of our LangGraph State (per task) as our multi-agent flow runs through its paces:
     const langsmithGuiLink = `https://smith.langchain.com/studio/thread/${thread_id}?baseUrl=${host}`;

     let previousChunk = null;

     for await (const chunk of streamResponse) {
       console.log(chunk);
       if (chunk.data.report != null && chunk.data.report != "Full report content here") {
         setOrderedData((prevOrder) => [...prevOrder, { ...chunk.data, output: chunk.data.report, type: 'report' }]);
         setLoading(false);
       } else if (previousChunk) {
         const differences = findDifferences(previousChunk, chunk);
         setOrderedData((prevOrder) => [...prevOrder, { type: 'differences', content: 'differences', output: JSON.stringify(differences) }]);
       }
       previousChunk = chunk;
     }
   }
Notice in an earlier code snippet that we leveraged the client.runs.stream method.
That means that the LangGraph API Server will feed us back updates in chunks. Those chunks can contain: the updated state of the Job currently running or any custom errors our python scripts encountered on our deployed LangGraph server.
In our case, we wanted to show our users a custom play-by-play of the LangGraph API Job - therefore, we also added a findDifferences function whose role is to calculate the difference between two JavaScript objects.
If the Graph completes the report, that report is displayed to the user.
If the Graph had some field edits in real-time, those differences in the Graph are displayed to the user.
Summary
In this blog post, we show how we triggered our LangGraph multi-agent flows via React & LangGraph Cloud. These flows mimic human reasoning, making them quite complex. However, as demonstrated in the walkthrough above, an elegant API simplifies the process and makes everything fall into place effortlessly.