Note: See the accompanying GitHub repo for this blogpost here.
ChatGPT has taken the world by storm. Millions are using it. But while it’s great for general purpose knowledge, it only knows information about what it has been trained on, which is pre-2021 generally available internet data. It doesn’t know about your private data, it doesn’t know about recent sources of data.
Wouldn’t it be useful if it did?
This blog post is a tutorial on how to set up your own version of ChatGPT over a specific corpus of data. There is an accompanying GitHub repo that has the relevant code referenced in this post. Specifically, this deals with text data. For how to interact with other sources of data with a natural language layer, see the below tutorials:
High Level Walkthrough
At a high level, there are two components to setting up ChatGPT over your own data: (1) ingestion of the data, (2) chatbot over the data. Walking through the steps of each at a high level here:
Ingestion of data
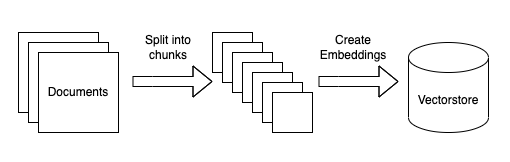
This can be broken in a few sub steps. All of these steps are highly modular and as part of this tutorial we will go over how to substitute steps out. The steps are:
- Load data sources to text: this involves loading your data from arbitrary sources to text in a form that it can be used downstream. This is one place where we hope the community will help out!
- Chunk text: this involves chunking the loaded text into smaller chunks. This is necessary because language models generally have a limit to the amount of text they can deal with, so creating as small chunks of text as possible is necessary.
- Embed text: this involves creating a numerical embedding for each chunk of text. This is necessary because we only want to select the most relevant chunks of text for a given question, and we will do this by finding the most similar chunks in the embedding space.
- Load embeddings to vectorstore: this involves putting embeddings and documents into a vectorstore. Vecstorstores help us find the most similar chunks in the embedding space quickly and efficiently.
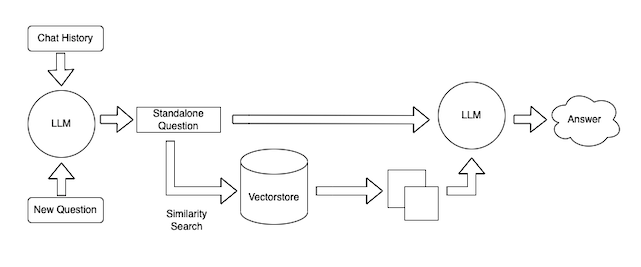
Querying of Data

This can also be broken into a few steps. Again, these steps are highly modular, and mostly rely on prompts that can be substituted out. The steps are:
- Combine chat history and a new question into a single standalone question. This is necessary because we want to allow for the ability to ask follow up questions (an important UX consideration).
- Lookup relevant documents. Using the embeddings and vectorstore created during ingestion, we can look up relevant documents for the answer
- Generate a response. Given the standalone question and the relevant documents, we can use a language model to generate a response
We will also briefly touch on deployment of this chatbot, though not spend too much time on that (future post!)
Ingestion of data
This section dives into more detail on the steps necessary to ingest data.

Load Data
First, we need to load data into a standard format. Again, because this tutorial is focused on text data, the common format will be a LangChain Document object. This object is pretty simple and consists of (1) the text itself, (2) any metadata associated with that text (where it came from, etc).
Because there are so many potential places to load data from, this is one area we hope will be driven a lot by the community. At the very least, we hope to get a lot of example notebooks on how to load data from sources. Ideally, we will add the loading logic into the core library. See here for existing example notebooks, and see here for the underlying code. If you want to contribute, feel free to open a PR directly or open a GitHub issue with a snippet of your work.
The line below contains the line of code responsible for loading the relevant documents. If you want to change the logic for how the documents are loading, this is the line of code you should change.
loader = UnstructuredFileLoader("state_of_the_union.txt")
raw_documents = loader.load()
Split Text
In addition to just loading the text, we also need to make sure to chunk it up into small pieces. This is necessary in order to make sure we only pass the smallest, most relevant pieces of text to the language model. In order to split up the text, we will need to initialize a text splitter and then call it on the raw documents.
The lines below are responsible for this. If you want to change how to the text is split, you should change these lines
text_splitter = RecursiveCharacterTextSplitter()
documents = text_splitter.split_documents(raw_documents)
Create embeddings and store in vectorstore
Next, now that we have small chunks of text we need to create embeddings for each piece of text and store them in a vectorstore. This is done so that we can use the embeddings to find only the most relevant pieces of text to send to the language model.
This is done with the following lines. Here we use OpenAI’s embeddings and a FAISS vectorstore. If we wanted to change either the embeddings used or the vectorstore used, this is where we would change them.
embeddings = OpenAIEmbeddings()
vectorstore = FAISS.from_documents(documents, embeddings)
Finally, we save the created vectorstore so we can use it later. That way, we only need to run this ingest script once.
with open("vectorstore.pkl", "wb") as f:
	pickle.dump(vectorstore, f)
This is the entirety of the ingestion script! After you’ve modified this according to your preferences, you can then run `python ingest_data.py` to run the script. This should generate a `vectorstore.pkl` file.
Query data
So now that we’ve ingested the data, we can now use it in a chatbot interface. In order to do this, we will use the ChatVectorDBChain. In order to customize this chain, there are a few things we can change.
Condense Question Prompt
The first thing we can control is the prompt that takes in the chat history and new question and produces a standalone question. This is necessary because this standalone question is then used to look up relevant documents.
This is a sneaky important step. If you just used the new question to look up relevant documents, your chatbot will not work well for follow up questions (because there may be information in the previous exchange that is needed to look up relevant docs). If you embed the whole chat history along with the new question to look up relevant documents, you may pull in documents no longer relevant to the conversation (if the new question is not related at all). Therefor, this step of condensing the chat history and a new question to a standalone question is very important.
This prompt is the CONDENSE_QUESTION_PROMPT in the query_data.py file.
Question-Answering Prompt
The other lever you can pull is the prompt that takes in documents and the standalone question to answer the question. This can be customized to give your chatbot a particular conversational style.
This prompt is the QA_PROMPT in the query_data.py file
Note: when working off of the GitHub repo, you MUST change this prompt. The current prompt in there specifies that they should only answer questions about the state of the union address, which works for the dummy example but is probably not good for your use case.
Language Model
The final lever to pull is what language model you use to power your chatbot. In our example we use the OpenAI LLM, but this can easily be substituted to other language models that LangChain supports, or you can even write your own wrapper.
Putting it all together
After making all the necessary customizations, and running python ingest_data.py, how do you interact with this chatbot?
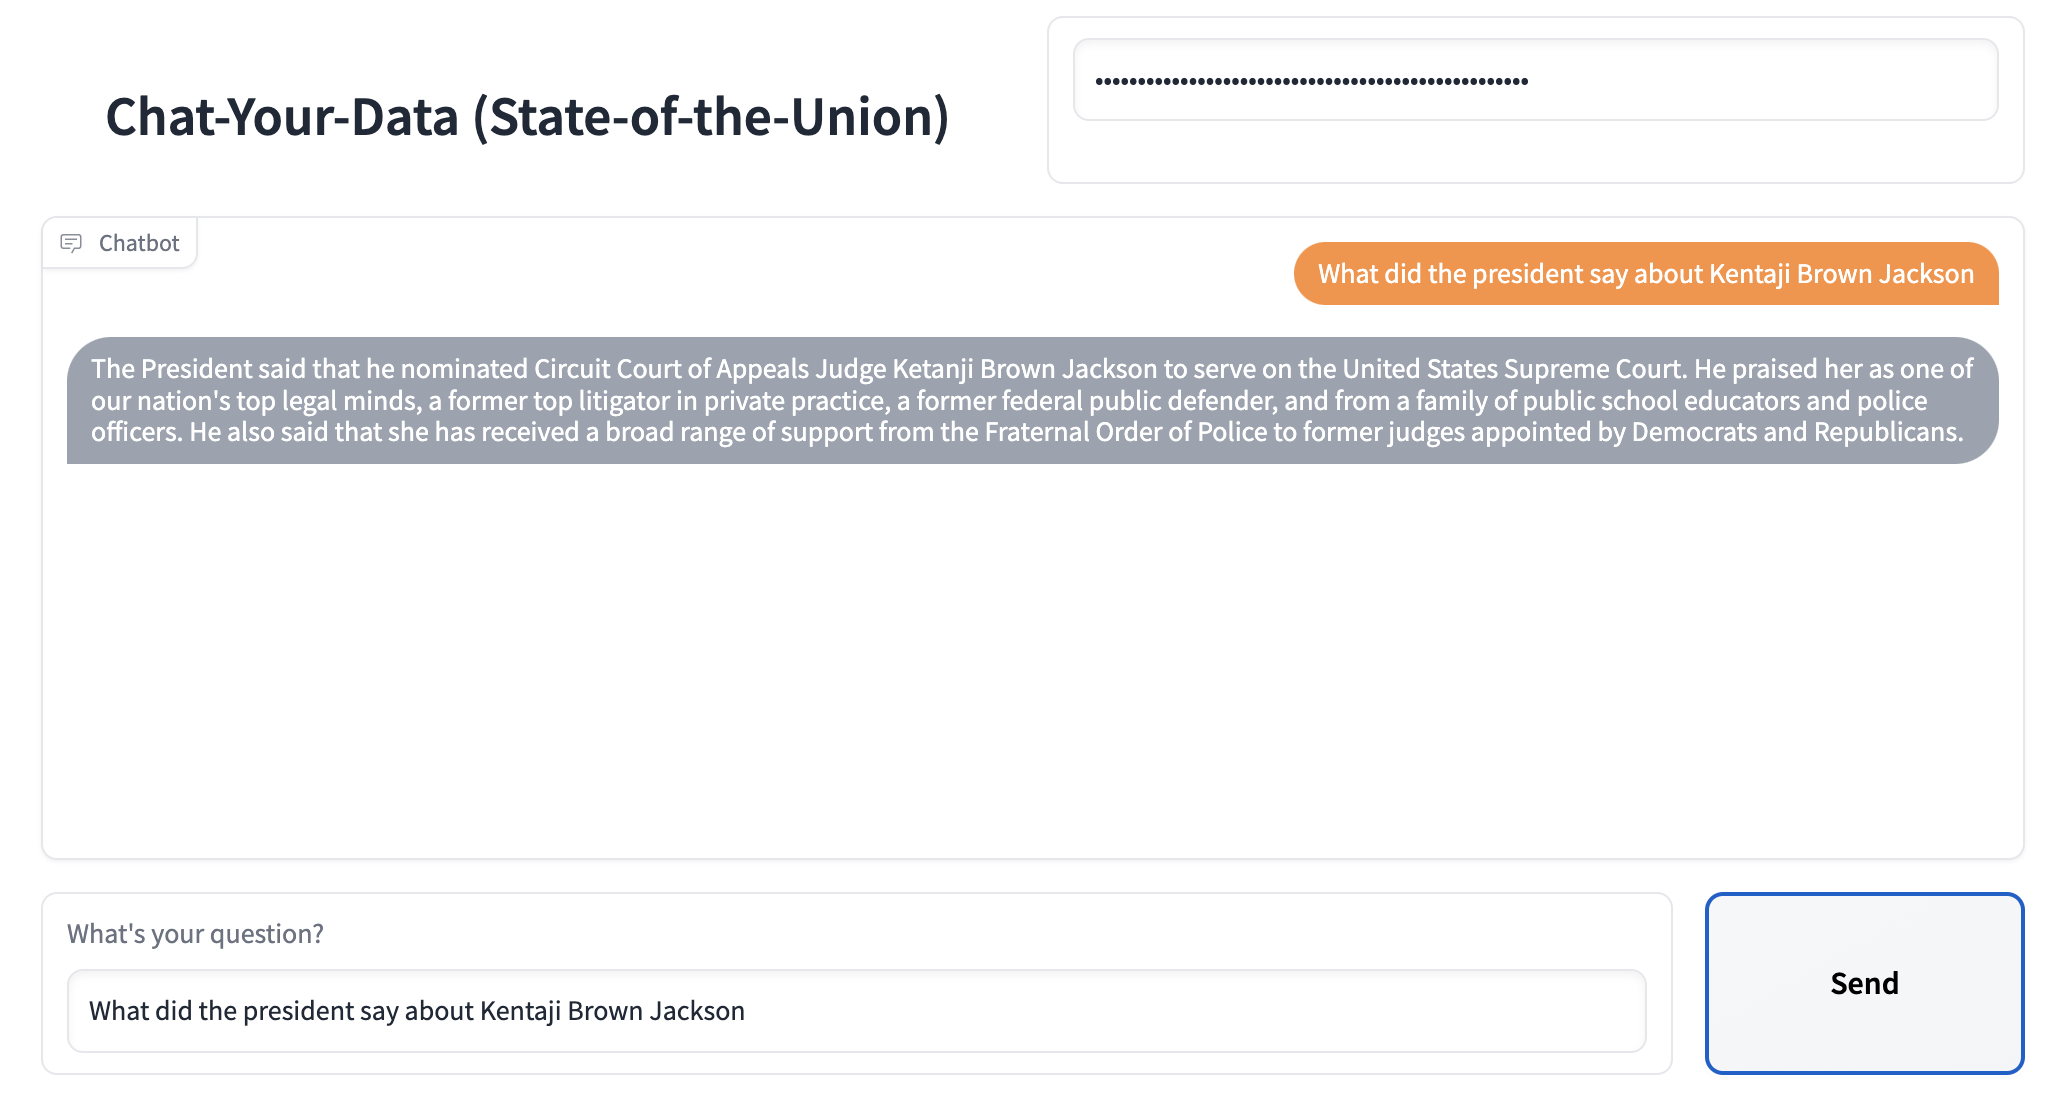
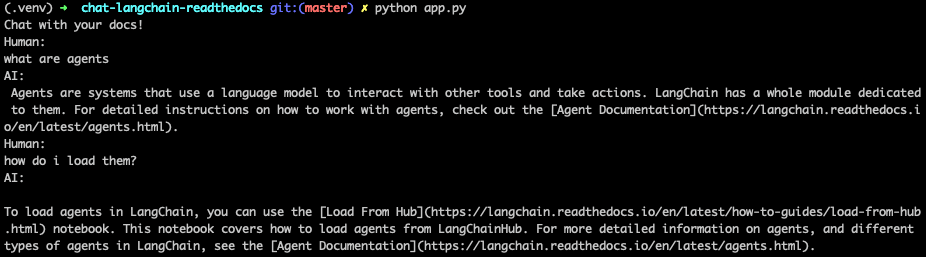
We’ve exposed a really simple interface through which you can do. You can access this just by running python cli_app.py and this will open in the terminal a way to ask questions and get back answers. Try it out!
We also have an example of deploying this app via Gradio! You can do so by running python app.py. This can also easily be deployed to Hugging Face spaces - see example space here.